Configuring IntelliSight Devices: Camera Setup
Actions Explorer
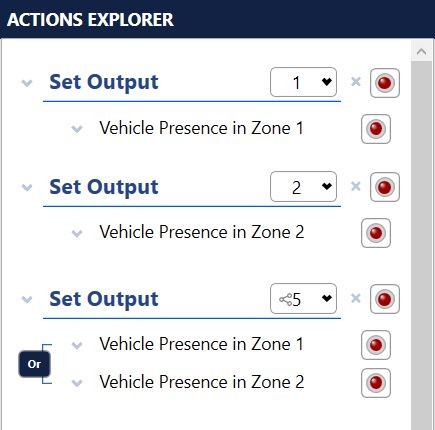
The Actions Explorer section is used to:
- View, by output, which conditions/zones an output is assigned to.
- Set the AND/OR logic for conditions with the same output.
- Remove Set Output actions from a condition.
- Change the initial state (ON/OFF) of a pulse output.
- Set a delay for vehicle presence.
- Add a digital LED overlay for output and/or presence conditions on the video. The LED indicator assoicated with the overlay will light up when the output or condition is activated.
To use the Actions Explorer, do the following.
- Click the Actions Explorer heading to expand the section.
- To change the description of an output or condition, highlight it and type a new description. For additional information about changing descriptions, see Changing Zone, Condition, and Action Descriptions.
To change the output assigned to a zone/condition combination, select the output then use the drop-down menu to select the new output. NOTE: Outputs that cannot be shared do not appear in the list.
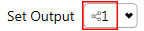
If a symbol appears to the left of the number, it indicates that the output is assigned to more than one set output action.
Changing the output changes it for all conditions that use the output.
By default, outputs with multiple conditions are set to a logical OR operation. To change the operation to a different setting, click on it (click on OR to change to AND and vice versa).
NOTES:
- To add a delay when two or more vehicle presence zones share an output, see Step 3.
- To change the pulse width for Pulse conditions, see Step 7.
3. Do you want to delay the activation of a Vehicle Presence condition?
4. Click the drop-down indicator to the left of Vehicle Presence.
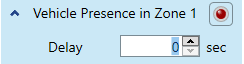
5. Select or enter the number of seconds or tenth of a second to delay.
6. To collapse the options box, click the arrow to the left of Vehicle Presence.
7. For Pulse conditions, do you want to change the pulse width from the default of 200 ms or the initial state of the output?
8. Click the drop-down indicator to the left of Set Output.
The following appears.
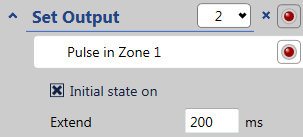
9. To change the initial state of the output from ON to OFF, uncheck the initial state on check box.
10. For Extend, enter a value between 200 and 400 milliseconds.
11. To collapse the output options box, click the arrow to the left of Set Output.
12. To add an output AND/OR presence LED overlay on the video, click the red button on the right side.
13. To display the overlay, select one or both of the following. NOTE: Both are selected by default.
- Show Video Overlay: The icon and overlay text will appear on the image when video is played.
- Show Setup Controls: The icon and overlay text will appear on the static image.
Version 4.3.1 - Copyright © 2024, Image Sensing Systems, Inc. All rights reserved.